Introduction
Laravel Cloud offers a fully managed WebSocket infrastructure powered by Laravel Reverb clusters. Laravel Reverb is a Pusher-compatible WebSocket cluster which offers support for private channels, presence channels, client-events, and more, making it easy to add real-time features and functionality to your Laravel applications. You can create Laravel Reverb powered WebSocket clusters directly from the Laravel Cloud dashboard (no external accounts needed) and attach them to your application’s environments.Laravel Reverb
Laravel Reverb is an open source, high-performance WebSocket cluster designed specifically for Laravel applications. When running managed Laravel Reverb on Laravel Cloud, Reverb clusters are automatically provisioned and fully managed by Cloud, allowing you to avoid the time, complexity, and DevOps expertise typically required to set up and maintain a scalable and high-availability WebSocket cluster manually. See the pricing docs for details on concurrent connections, limitations, and pricing.Creating clusters
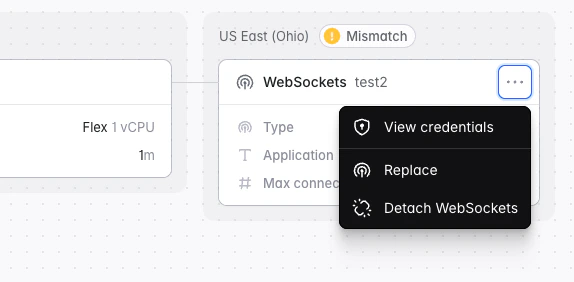
To create a Laravel Reverb powered WebSocket cluster, go to your Organization’s “Resources” page, click the “WebSockets” tab, then click ”+ New WebSocket cluster”. Laravel Cloud will prompt you to select a region and the maximum number of concurrent connections your cluster needs to be able to handle. Laravel Cloud will automatically create a default WebSocket application for you calledmain. To attach it to an environment, go to your application canvas and click “Add resource” -> “WebSockets”. WebSocket applications allow you to segment and share your cluster capacity across multiple applications and environments.
Once the WebSocket application has been attached to the environment, redeploy your application for the changes to take effect.
Connecting your application
- Laravel
- Symfony
Ensure your application has Laravel Reverb and Laravel Echo installed:Cloud automatically injects the Reverb environment variables needed by your application, including the frontend variables required by the Laravel Echo JavaScript client. No manual configuration is required.
Editing, resizing, and splitting clusters
You can edit and resize your WebSocket cluster via your organization’s “Resources” page. Go to “WebSocket clusters” and click the ”…” icon on your cluster, then click “Edit settings”. You can use a single WebSocket cluster across multiple applications by splitting the maximum concurrent connections you have provisioned to your cluster across multiple WebSocket applications.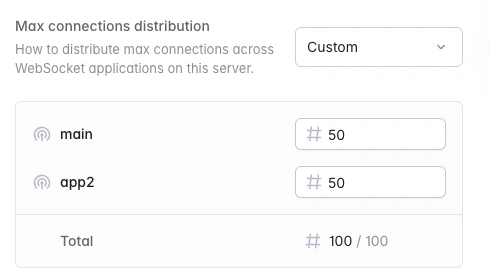
Metrics
You may view your WebSocket metrics, such as Connection Count and Message Rate, via your organization’s “Resources” page. From the “Resources” page, navigate to the “WebSockets” tab and click the ”…” icon for an active Reverb cluster. Then, click “View metrics”. Use the drop-down in the top right to drill down into the metrics of an individual application.Detaching applications
If a WebSocket cluster is no longer needed by your application, you can detach it from your application canvas.