Documentation Index
Fetch the complete documentation index at: https://cloud.laravel.com/docs/llms.txt
Use this file to discover all available pages before exploring further.
Introduction
Laravel Cloud provides fully managed AWS RDS databases (both MySQL and Postgres) for your application. RDS databases offer powerful features, including point-in-time recovery (PITR), read replicas, multiple deployment options, and more.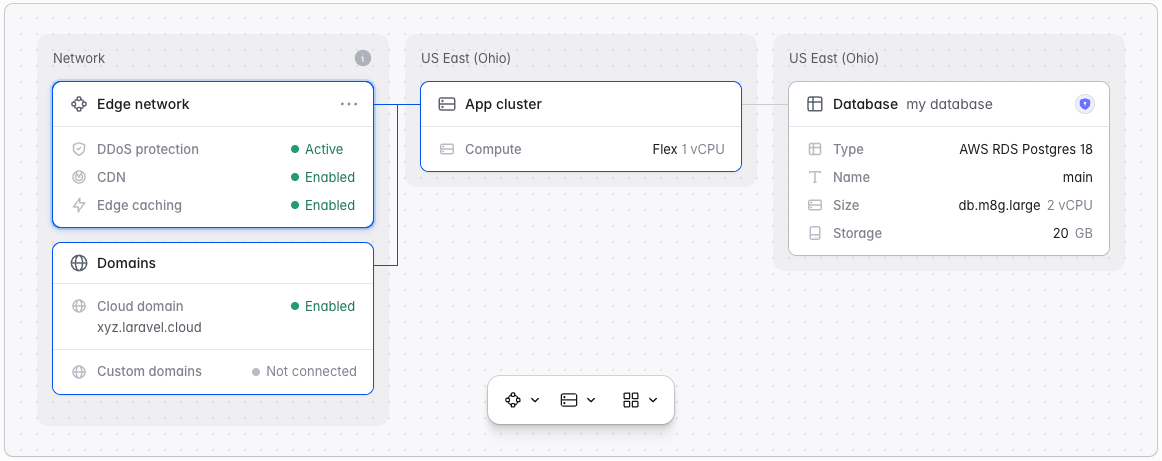
RDS databases are only available with Private Cloud. If you do not see RDS as an option when creating a database, please contact us to provision a dedicated cluster in your chosen region.
Creating RDS databases
To create and attach an RDS database to an environment:- Navigate to “Organization > Resources > Databases”
- Click ”+ New database cluster”
- Cluster name: A unique name for your database cluster
- Type: Choose between AWS RDS MySQL 8.4 or AWS RDS Postgres 18
- Region: Choose a Private Cloud region
- Configuration: Choose a preset or customize your RDS configuration
It may take up to 20 minutes for your RDS database to be fully created. You do not need to stay on the page.
Customizing RDS databases
Laravel Cloud offers you complete control over your RDS configuration. When creating or editing an RDS cluster, you may control the following:Choosing the right compute size
Laravel Cloud supports both m8g and m7g instances (depending on your desired region). The amount of RAM your RDS cluster has determines how many simultaneous connections it can support:| Instance Size | MySQL Connection Limit |
|---|---|
| large (8GiB RAM) | ~630 |
| xlarge (16GiB RAM) | ~1,260 |
| 2xlarge (32GiB RAM) | ~2,520 |
| 4xlarge (64GiB RAM) | ~5,040 |
| 8xlarge (128GiB RAM) | ~10,080 |
| 12xlarge (192GiB RAM) | ~15,120 |
| 16xlarge (256GiB RAM) | ~20,160 |
Provisioning storage
You may provision from 20GB up to 1,000GB of storage on your RDS database. While you can increase this value at any point, you can never decrease it.Enabling public endpoint
By default, RDS databases on Laravel Cloud are not publicly accessible. To enable public access, enable the public endpoint in your RDS cluster settings. You can change this setting at any time.Picking a maintenance window
AWS may occasionally need to perform maintenance on your RDS instance, which may cause downtime. You can control your scheduled maintenance window by clicking “Edit settings > Maintenance window” and picking a 30-minute slot. If you don’t pick a specific time slot, AWS will perform those updates during the default time slot for your region.Selecting a deployment option
Laravel Cloud supports the following RDS deployment options:- Single-AZ, 1 instance. One DB instance in a single availability zone. Best for dev or non-critical workloads.
- Single-AZ, with read replicas. One primary instance plus up to 15 read replicas for read-heavy workloads.
- Multi-AZ, 2 instances. Two instances in different availability zones for higher availability. AWS automatically fails over to the standby if the primary fails.
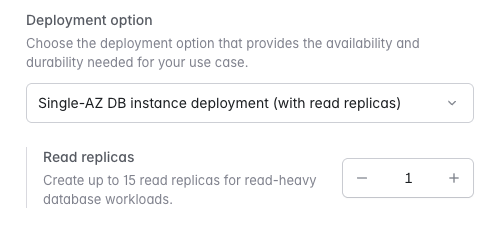
Using read replicas requires enabling point-in-time recovery (PITR) with a retention period of at least 1 day.
Connecting to database clusters
From your application
When a database is attached to an environment, Laravel Cloud will automatically inject the environment variables needed by the Laravel application to connect to the database, includingDB_HOST, DB_USERNAME, DB_PASSWORD, and DB_DATABASE. You may view these variables in your “Environment > Settings > General > Injected variables”.
From your local machine
To connect to your database from your local machine, navigate to your organization’s “Resources” page, then to your RDS cluster. Make sure your public endpoint is enabled and either click the “DeepLink” to open your database in a management client like TablePlus, or manually connect using the provided credentials.
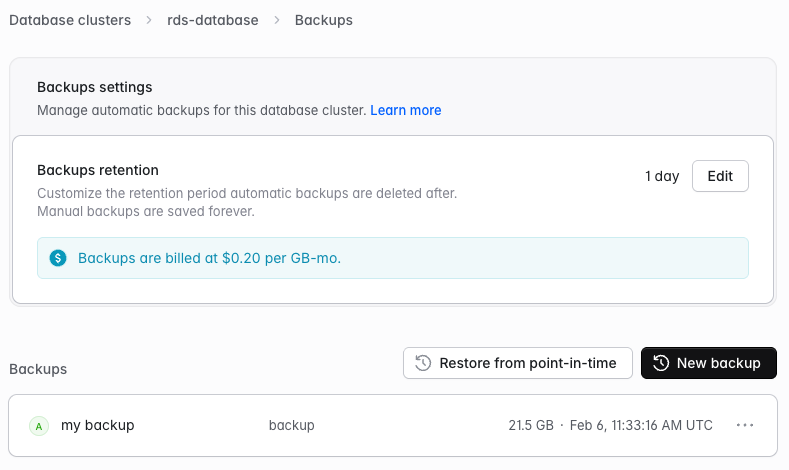
Database backups
To configure backups for your RDS cluster:- Navigate to “Organization > Resources > Databases”
- Click on your RDS cluster
- Click “Backups”
Point-in-time recovery (PITR)
Point-in-time recovery (PITR) combines daily snapshots with continuous transaction logging to protect your data. This allows you to restore your database to any specific second within your retention period (up to 30 days). To set up PITR, click “Edit” on your backup retention settings and enter your desired backup retention period.Manual snapshots
In addition to the automated PITR, you can take manual snapshots at any time from the database’s Backups page. Manual snapshots are retained until you delete them and are independent of the PITR retention period.